The goal of this lab is to create a new repository with basic content and push it to GitHub.
Prerequisites:
- A GitHub account
- Tools installed on your local machine as configured in Lab 1:
- Visual Studio Code
- Git with configuration
- PowerShell with the posh-git module
In this lab you will:
- Create a new repository on GitHub and then clone it to your local machine.
- Create a new branch in your local repository, add and edit files, then push your branch to your GitHub repository.
- Merge your branch back into the main branch using a pull request in GitHub.
- Sync the main branch to your local repository and clean up the working branches.
Step 1 - Create a new repository on GitHub and clone it
GitHub lets you add a README file at the same time you create your new repository. GitHub also offers other common options such as a license file, but you don’t have to select any of them now.
In the upper-right corner of any page, select
+, then select New repository.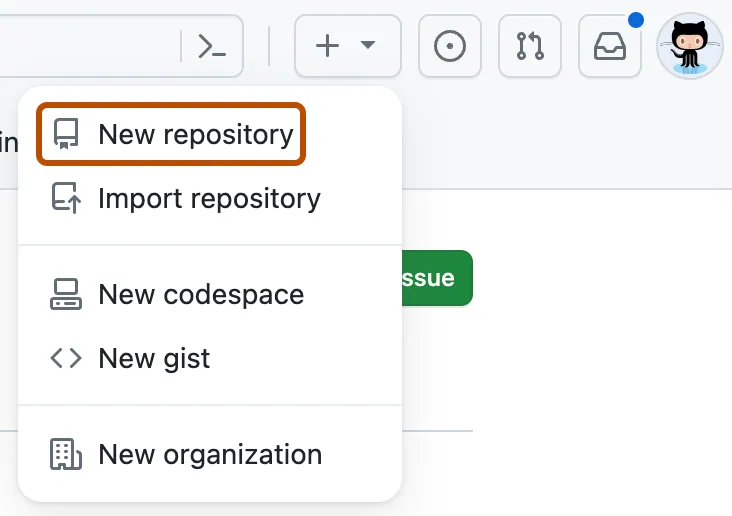
In the Repository name box, type in a name for your project (no spaces or special characters). For this lab, choose a name that’s different from your lab partner’s name. For example, you could add your initials to create a name like
sdwGitFun.In the Description box, type a short description. For example, type “This repository is for practicing the GitHub Flow.”
You can choose to make your repository Public or Private. Select Public.
Select Add a README file.
Select Create repository.
Copy the URL of the repository. You need this URL to clone the repository to your local machine.
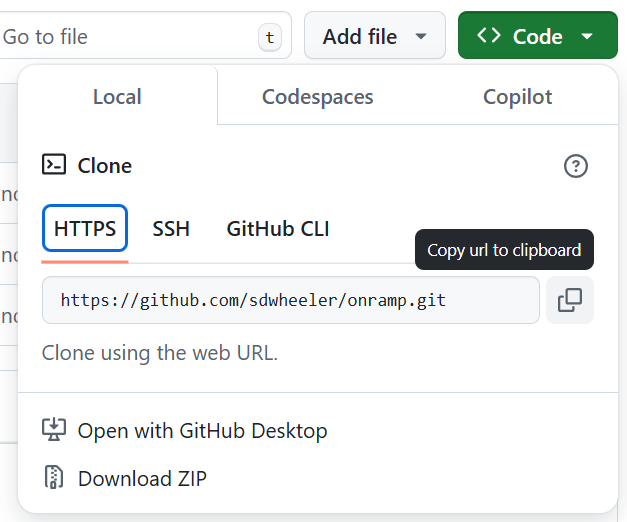
In your terminal, navigate to the directory where you want to clone the repository. For example, type
cd ~/Gitand press Enter.Type
git clone <repository URL>and press Enter.Git creates a new directory with the same name as the repository and copies all of the files from the remote repository to your local machine.
Step 2 - Create a new branch, make local changes, and push to GitHub
Now take a few minutes to add files to the repository. You can add any files you want, but here are a few suggestions:
Create a new working branch using the following command:
git checkout -b add-meta-filesCreate a new file called
LICENSE.mdand add a license to the file. You can use the ChooseALicense website to help you choose a license.Create a new file called
CONTRIBUTING.mdand add a short description of how to contribute to the project.Create a new file called
CHANGELOG.mdand add a short description of the changes made to the project.Use the commands you learned in Tracking changes to add the files to the staging area and commit them.
git add -A
git commit -m 'Add license, contributing, and changelog files'
Push your changes to GitHub:
git push origin add-meta-files
Step 3 - Merge your branch in a PR and sync to local
- Go to your repository on GitHub and select the Pull requests tab.
- Select the New pull request button.
- Make sure the base branch is
mainand the compare branch is your working branch (e.g.add-meta-files). - Select the Create pull request button.
- Fill out the pull request description and select Submit.
- Review the pull request and select Merge pull request to merge your changes into the main branch.
Step 4 - Sync your local repository and clean up working branches
Go back to your terminal and make sure you’re on the main branch:
git checkout mainPull the latest changes from GitHub to your local repository:
git pull origin mainThis updates your local main branch with the changes you just merged in GitHub.
Delete your working branch if you no longer need it:
git push origin --delete add-meta-files
git branch -D add-meta-files
The
git pushcommand deletes the branch in your GitHub repository. Thegit branchcommand deletes the working branch and the tracking branch reference from your local repo.